 Without doubt the holy-grail of self-sufficiency would have to be home-made toothpaste. I have been using this recipe for many, many years but have been reluctant to share due to the fact that ingredients are put in your mouth and healthy teeth are very important. I have visited the dentist several times for checkups since using this recipe and have had no negative impacts. However, I take no responsibility for anyone who chooses to use this recipe. Take care with making sure all jars and equipment are sterile (I boil in water) and be aware that ingredients may not be labelled as food grade- so if you choose to use them, that is at your risk.
I use a Thermomix, but theoretically you can use a food processor or even a whisk. The process is a bit like making mayonnaise. The quantity of ingredients is quite flexible, you can add more or less depending on your own taste preferences or if you like more or less froth when using. I have discovered that the key to the final taste is the quality of the soap component, consequently I made my own soap using only coconut oil. A tiny batch of home-made coconut soap will last a life-time. If you don't have the luxury of making your own soap, I recommend you add the higher quantity of peppermint or spearmint oil to cover the soapy taste. To make:
0 Comments
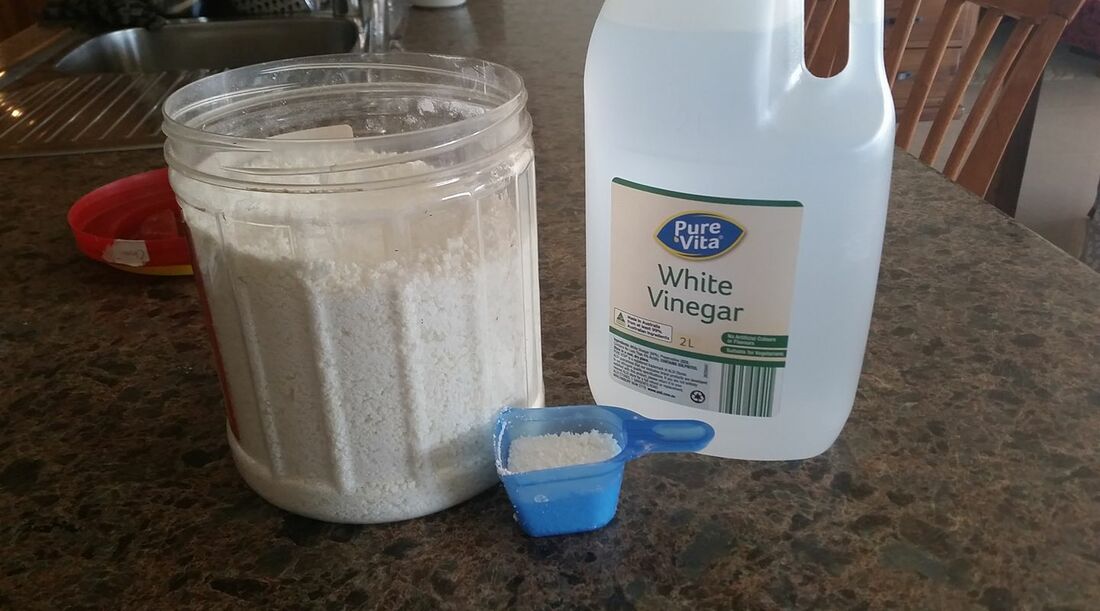 One of the first things I started doing in my self-sufficiency quest was making my own laundry powder. I was sick of all the packaging, the cost and the poor performance of commercial powders. Plus having a septic system I wanted to make sure there were no fillers or chemicals that I would rather not have. I have made it dozens of times with varying quantities of ingredients and it has always performed well, including on my husbands work clothes which are usually covered in mud and engine grease. The grease still stains, but there isn't a commercial powder that performs any better.
So the recipe is 2 bars grated soap, 50-60g salt, 75-100g Borax and 500-750 g washing soda. I use a Thermomix to grate the soap, but a high power food processor may do (though don't blame me if you damage your machine!). Place the powder under the clothes to allow the maximum time to dissolve and use white vinegar in the rinse dispenser. I have started using my home-made tallow soap containing eucalyptus oil for this recipe and even home made apple-cider vinegar. Both are performing well. 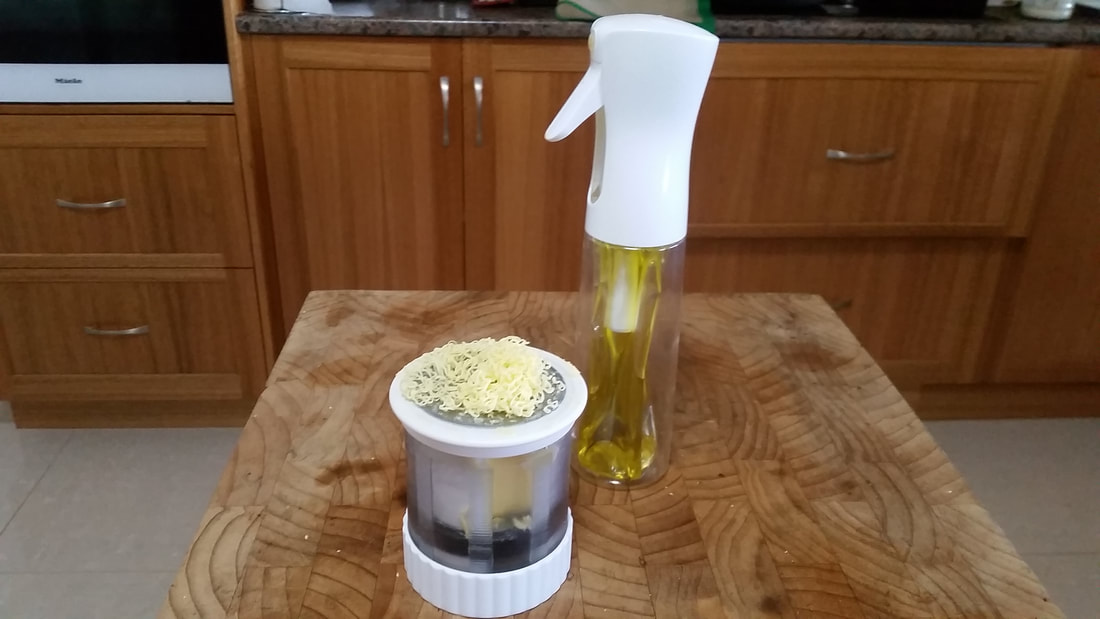 Sometimes you have to spend money to save money, like solar power and water tanks. But here are a couple of kitchen gadgets that won't break the bank and should result in less money spent down the track and much less waste into landfill.
Oil spray in a can was a great invention for the home cook, but the oil is expensive gram for gram, the oil can be of dubious quality and the empty cans are just another burden on the environment. I love my refillable oil sprayer. The inner cavity collapses as the oil is used so the remaining oil is protected from oxidation, plus I can use my favourite olive oil. I used to always buy spreadable 100% butter, but the escalating cost and the plastic tubs made me reconsider and buy my butter by the block. Leaving a small portion out over winter was fine, but now that summer is upon us a new solution was needed. My Mum put me on to the gadget in the photo. You put a portion of butter in the container and store it in the fridge. When you need butter you turn the bottom and grated butter appears, ready to apply to soft bread. What is your favourite money and waste saving gadget?  So what is the difference between reusable tissues and a handkerchief you may ask? I was a huge user of tissues but the cost and the waste involved put them in my sights as a challenge to eliminate. I was never a fan of the humble hanky, too rough on the nose and not absorbent enough for my liking, plus the cost of getting enough of them to allow me to use them like a tissue (one blow and get a fresh one) was prohibitive.
I experimented with several fabrics from my rag pile and settled on flannelette as the softest and most absorbent. Unlike some of the knitted fabrics, it does have a tendency to fray, but being a bit lazy I settled on a zig-zag cut with pinking shears and just put up with a few loose threads for a while, but eventually the fraying was too severe so I had to hem them all with a quick zig-zag stitch. I was lucky enough to already have the beautiful wooden tissue box pictured, but failing that, I find a neatly folded stack of reusable tissues is no less attractive than a box of paper tissues. I also had the lovely decorative tin which I deposit my used "tissues" into until it is time to do a load of washing at which time I tip them in to the machine without even having to touch them again. Wash with your lights/whites as flannelette will leave fluff on dark fabrics. It takes a fair bit of courage to use these in public (especially my frayed ones) but even if you don't feel like being a trail blazer in public, there are still enormous benefits from using these at home. PS. If you are lucky enough to find a box like that above, you can interleave the "tissues" so that pulling up one automatically brings up the next. If you need to know how, drop a comment below. 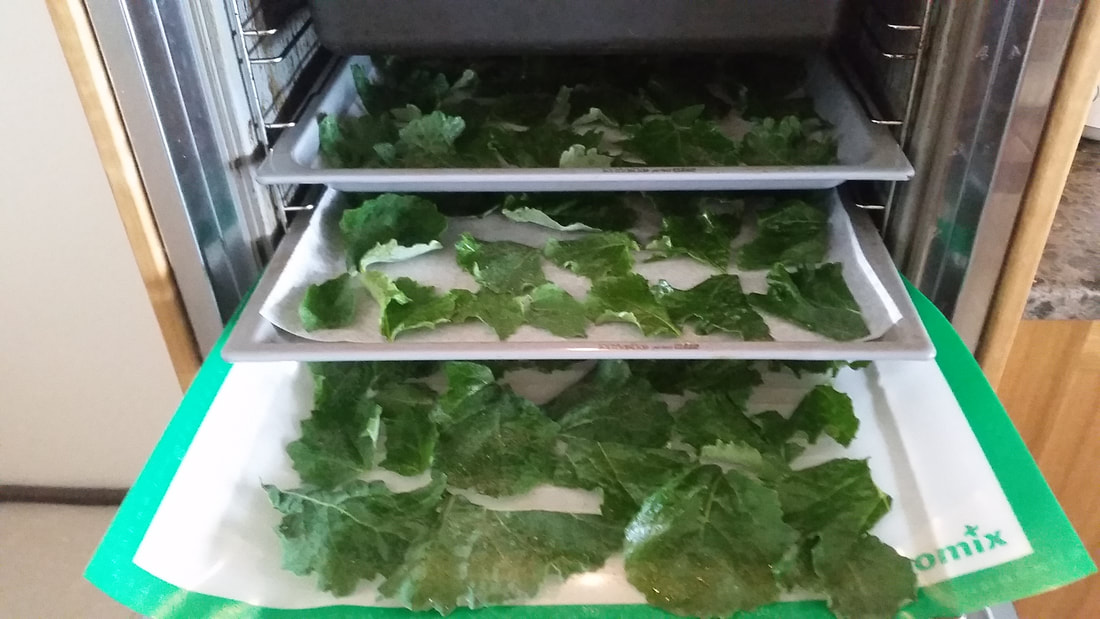 Kale is one of those vegetables we are told is good for us, but it also one that can taste pretty awful if used in the wrong way. One use for which it is absolutely delish is Kale chips and it is quick and easy too.
The simplest method is to place the kale, hard stems removed, single layered on baking paper or a non-stick mat into an oven at 180 degrees for about 5 to 10 minutes. Allow to cool and place in an air-tight container for up to a week. Other variations are to place them in a colander and pour over boiling water before placing them in the oven. This has the advantage of making them lie flat on the tray and to give them a bit of a sanitising rinse. You can also use an oil sprayer to spray a thin layer of oil on them before baking and/or sprinkle with salt or seasonings. For a salt and vinegar taste, sprinkle with citric acid and salt. 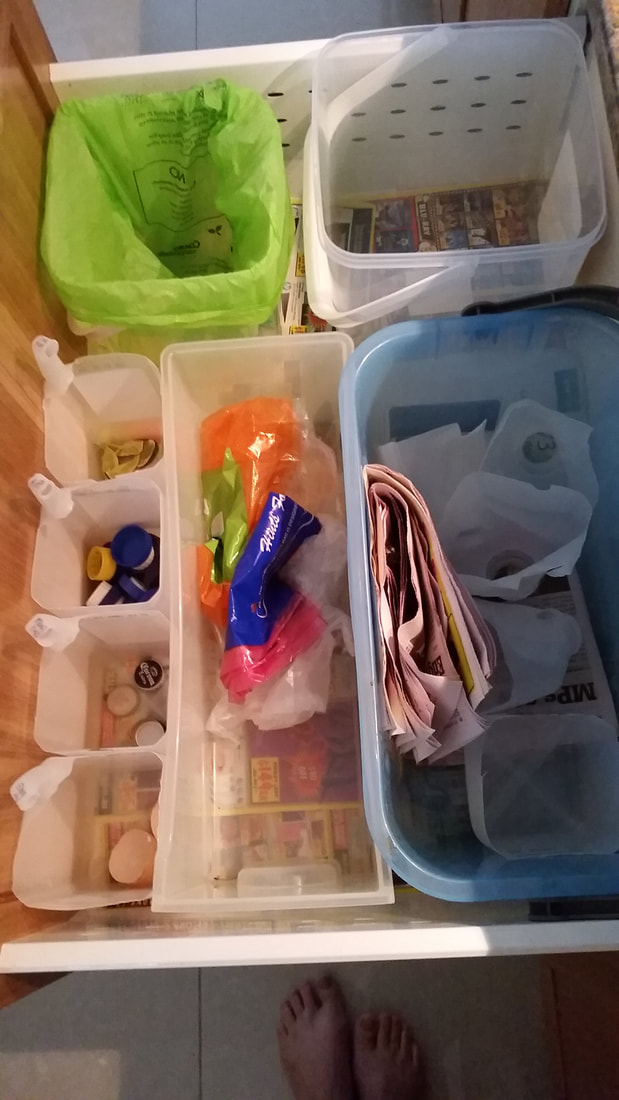 When you are practicing self-sufficiency or are interested in making sure your waste goes to the right "stream" it can require a fair bit of sorting. If you are lucky enough to have a deep pot draw like mine you can make that process a lot easier and neater. Use rectangular or square containers and label them for what each is for. Plastic milk cartons with the tops removed (keeping the handle for the label and to lift out) make a great receptacle for the little items like egg shells and tea bags.
 There is no real reason to buy plant tags ever again. There are so many ways you can label your seedlings. The ones above are cut from margarine containers (make sure the margarine is washed off or the texta won't work on them).
The one's pictured also had a tendency to blow away in strong winds, so now I just go for the strip shape. Another idea is old CD's and DVD's half buried. They look brilliant in the garden. Some textas fade fairly fast, but the thicker ones tend to last longer. One GR's member uses smooth stones with the names painted on, but again texta should work. I don't put a date on them so I can reuse them over and over. I use an old diary to put the planting dates in. By reference to the date only (not the day) I can use the one diary over several years and thereby get a feel for the best time to plant and harvest and to compare years. 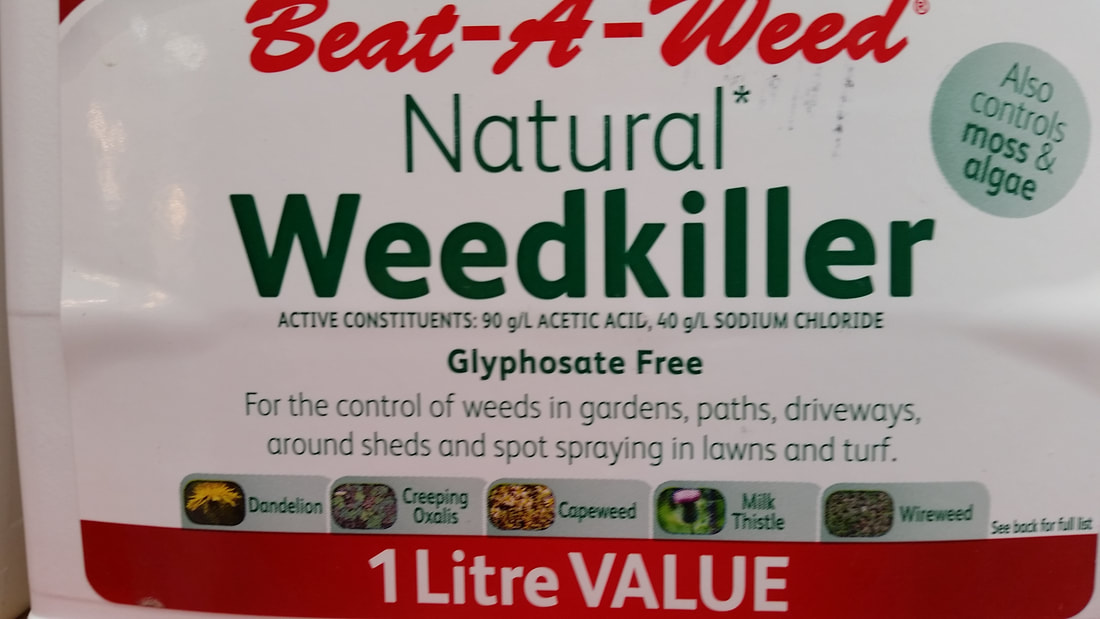 Corporations love to jump on the band-wagon of the low-tox movement, so products like these are starting to line the shelves of Bunnings and the supermarkets. But this is where a bit of high school science knowledge can help. Instead of paying $8 per litre for this "natural" weedkiller, one can read the ingredients list and realise that it is a solution of salt and vinegar.
It is 9% vinegar and 4% salt. You can buy 10% vinegar from bulk cleaning suppliers (or locally at the Replenish Store) and add 40 grams per litre of table salt and have exactly the same product at half the price. A drop of dishwashing liquid will help it to adhere to the weeds. Apply in full sunlight for full effect. There are probably other or better ways to control weeds, so this post is really about trying not to get hoodwinked in to paying high prices to corporations when you could just make it yourself. 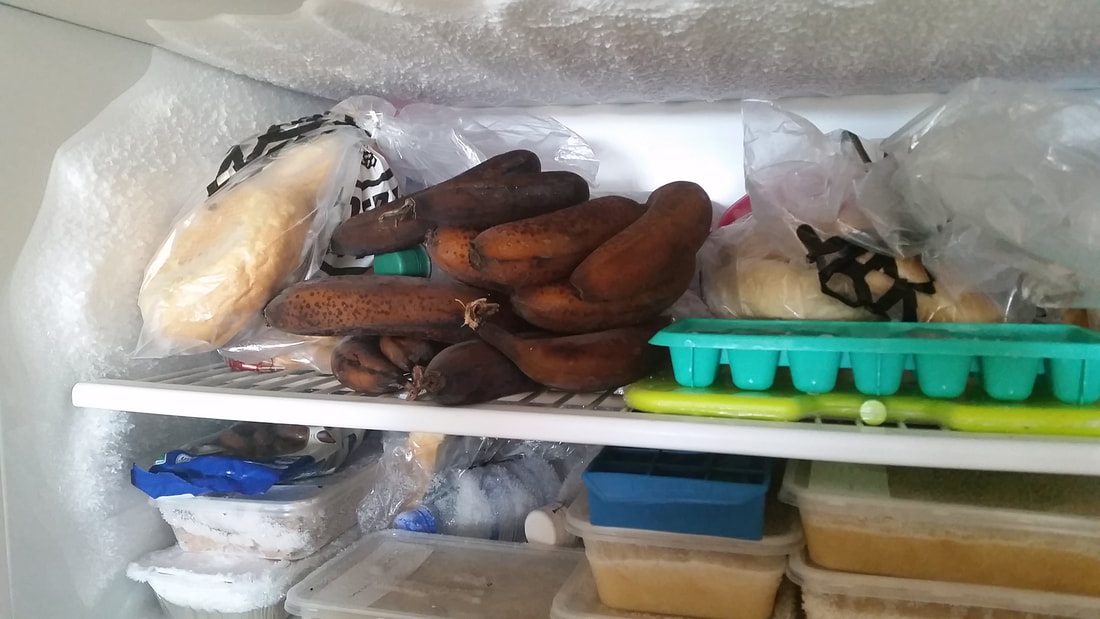 There is never a need to throw out overripe bananas. Just pop them straight into the freezer. Uses include Banana cake or bread, smoothies or banana ice-cream.
To use, partially defrost so that the skins can be removed and use the frozen pulp. If you defrost completely they are still OK, e.g. for cakes even though they may look disgusting. 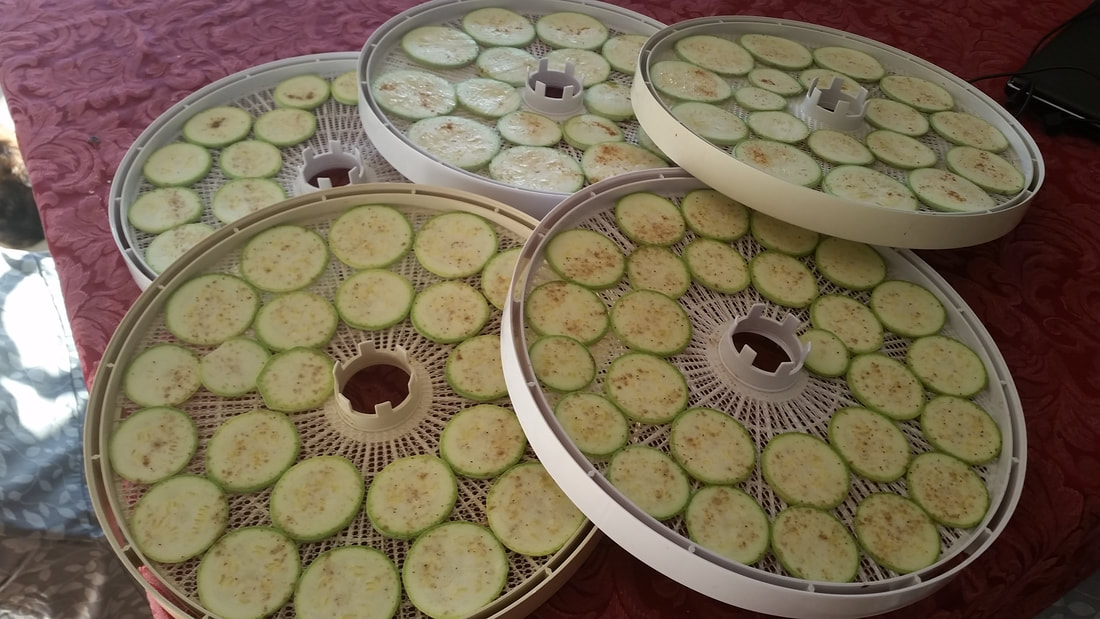 Zucchinis are incredibly easy to grow, which is why so many people do, but inevitably you will end up with may more zucchinis than you can eat. This is one way to use them up.
Slice the zucchini about 3 mm thick. Too thin and they will fall apart after drying and too thick and they won't dry evenly. Use a mandolin for best results. Lay out on a dehydrator tray without overlapping or they will stick together. Dry for however long it takes to get them crisp (6-12 hours). Store in an air-tight container for up to a week. Great on their own or with dips. |
 RSS Feed
